Checkout
Checkout by Peach Payments is a ready-to-use payment experience.
With Checkout, merchants have the ability to accept a full range of payment methods with a single developer integration.
Peach Payments offers Checkout through the following implementations:
- Embedded Checkout: Embed checkout on your website and accept payments without redirecting to Peach Payments Checkout.
- Embedded Express: A wallet-only variant of Embedded Checkout that displays Apple Pay, Google Pay, and Samsung Pay for one-click payment, ideal for surfacing free-standing wallet buttons earlier and saving clicks.
- Hosted Checkout: Redirects customers to Peach Payments Checkout to accept payments.
You cannot embed Hosted Checkout or Embedded Checkout in an iframe. Attempting to do so could cause payment methods to fail.
Payment methods
For details on which payment methods Checkout supports, see the Payment methods section.
Enable payment methods using the Peach Payments Dashboard. Checkout is PCI compliant and provides both the merchant and customer confidence in the security of web payments.
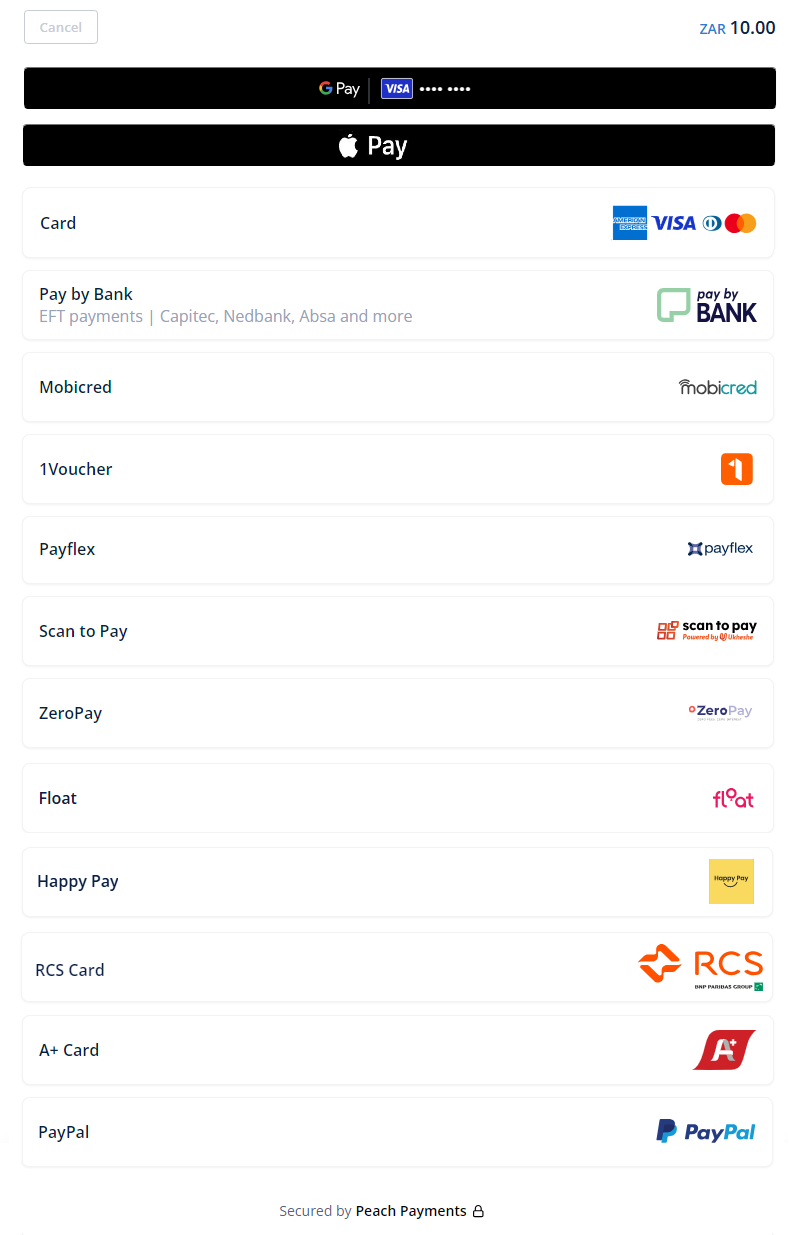
Example Checkout screen; note that not all payment methods are available in all regions or for all currencies.
User experience
Checkout streamlines the payment experience by allowing customers to confidently complete their online purchases.
Embedded Checkout
- Display a payment button on your Checkout page when a customer is ready to complete payment for their purchase.
- Generate and render a Checkout that includes the purchase details on your website.
- The rendered Checkout shows the customer the purchase amount and all the payment methods available to them to complete the purchase.
- The customer selects their desired payment method to complete the purchase.
- On your website, inform the customer of the Checkout result.
- If you've enabled a valid webhook, you receive a response with the details of the completed, cancelled, or uncertain transaction.
Embedded Express
- Display free-standing wallet buttons earlier in the customer journey where you want to offer one-click payment, saving clicks.
- The customer selects their desired wallet to complete the purchase.
- On your website, inform the customer of the Checkout result.
- If you've enabled a valid webhook, you receive a response with the details of the completed, cancelled, or uncertain transaction.
Hosted Checkout
- Display a payment button on your Checkout page when a customer is ready to complete payment for their purchase.
- From your backend, generate a Checkout and redirect the customer to the
redirectUrl. - The Checkout page shows the customer the purchase amount and all the payment methods available to them to complete the purchase.
- The customer selects their desired payment method to complete the purchase.
- If successful, Checkout redirects the customer back to your website with a confirmation of their transaction. If cancelled, Checkout redirects the customer back to the provided
shopperResultUrlor, if configured, thecancelUrl. - If you've enabled a valid webhook, you receive a response with the details of the completed, cancelled, or uncertain transaction.
Known limitations
- For Apple Pay, when using Embedded Checkout or iframing Hosted Checkout, follow the steps described in the known limitations section. Failing to do so results in Apple Pay payments not working.
- Embedded and Hosted Checkout ignore the
cancelUrlparameter and take customers to theshopperResultUrlinstead. To enable thecancelUrlparameter contact support. Embedded Checkout has more limitations that don't apply to Hosted Checkout. - If FNB is your acquirer, you cannot use special characters in the
merchantTransactionIdormerchantInvoiceIdparameters and must only use letters and numbers.
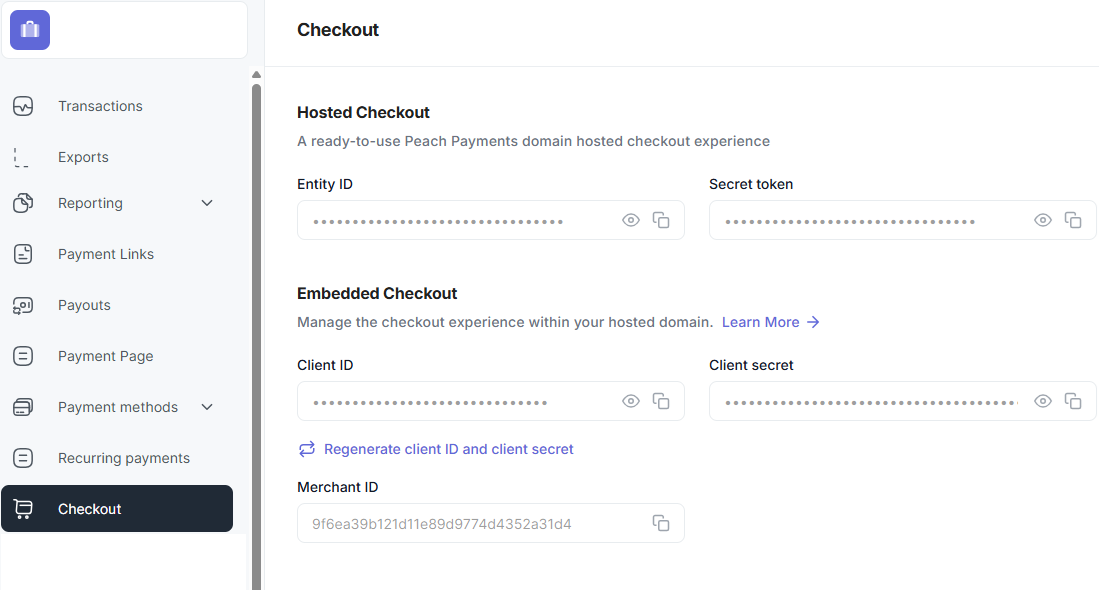
Find your credentials
Follow these steps to find your credentials:
- Log in to the Peach Payments Dashboard.
- In the left navigation menu, click Checkout.
- The API keys section enables you to copy your entity ID, secret token, client ID, client secret, and merchant ID.
If you don't have access to the Checkout section or can't find your credentials, contact support.
Checkout credentials.
To retrieve your sandbox credentials, switch to the sandbox Dashboard and follow the instructions above.
Test and go live procedure
While integrating, you have access to a sandbox account during user acceptance testing. Use this account to test fake payments to verify your integration.
For more information on testing, go live, and test cards and credentials, see the Test and go live procedure section.
Quick links

Updated about 1 month ago