Payment Links on the Dashboard
Activate Payment Links
Only certain roles can activate Payment Links.
To use Payment Links, you must first activate the service:
- Log in to the Peach Payments Dashboard.
- In the left navigation menu, click Payment Links.
- Click Activate Payment Links.
This activates the Payment Links service and enables you to create payment links.
Create a payment link
Only certain roles can create and cancel payment links.
Create and send payment links on the Dashboard as follows:
-
In the left navigation menu, click Create payment link or click Payment Links > Create > Single payment link. The Create payment link window opens.
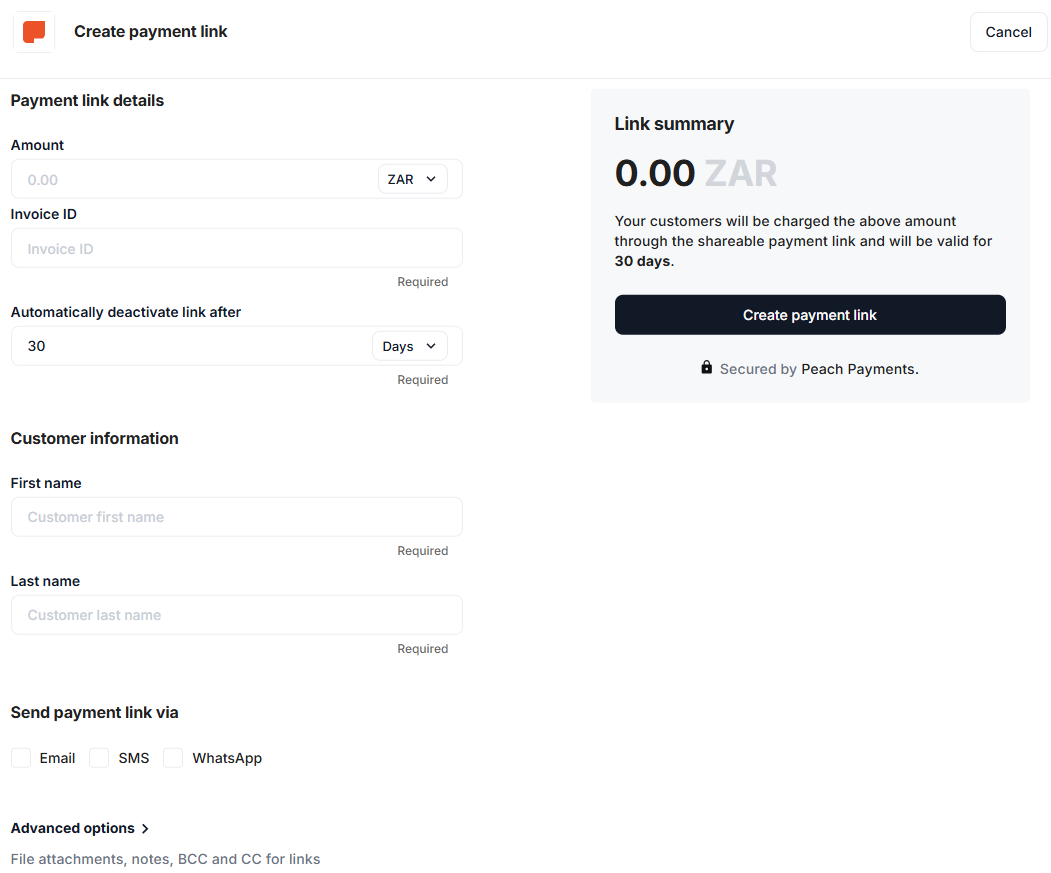
Create payment link.
-
Enter the payment link details, customer information, and advanced options, then click Create payment link.
-
A summary page appears and the payment link is automatically sent to the recipient through the communication mode chosen.
Create bulk payment links
Only certain roles can create bulk payment links.
The following video showcases how to create and send bulk payment links:
Create and send up to 1000 payment links on the Dashboard as follows:
- Click Payment Links > Create > Bulk payment links.
- In the Upload bulk file window that appears, click Download template.
- Unzip the
samples.zipfile, fill out thefull_sample.csvfile, deleting unnecessary parameters and not adding any of your own, then save it. Ensure that you adhere to the restrictions described in the Bulk payment links CSV parameters section. If the plus sign disappears from mobile numbers in your CSV when you save it, see the Payment Links FAQ for a workaround. - In the Upload bulk file window, click Choose file, select the filled out CSV, and click Open.
- In the Upload bulk file window, click Continue.
A new section appears in the My links section highlighting the status of the bulk file.
If the status of the bulk payment file is
Completed with errors, see the Payment Links FAQ for details on how to identify and resolve the errors.
View payment link status
View the status of payment links on Payment Links > My links.
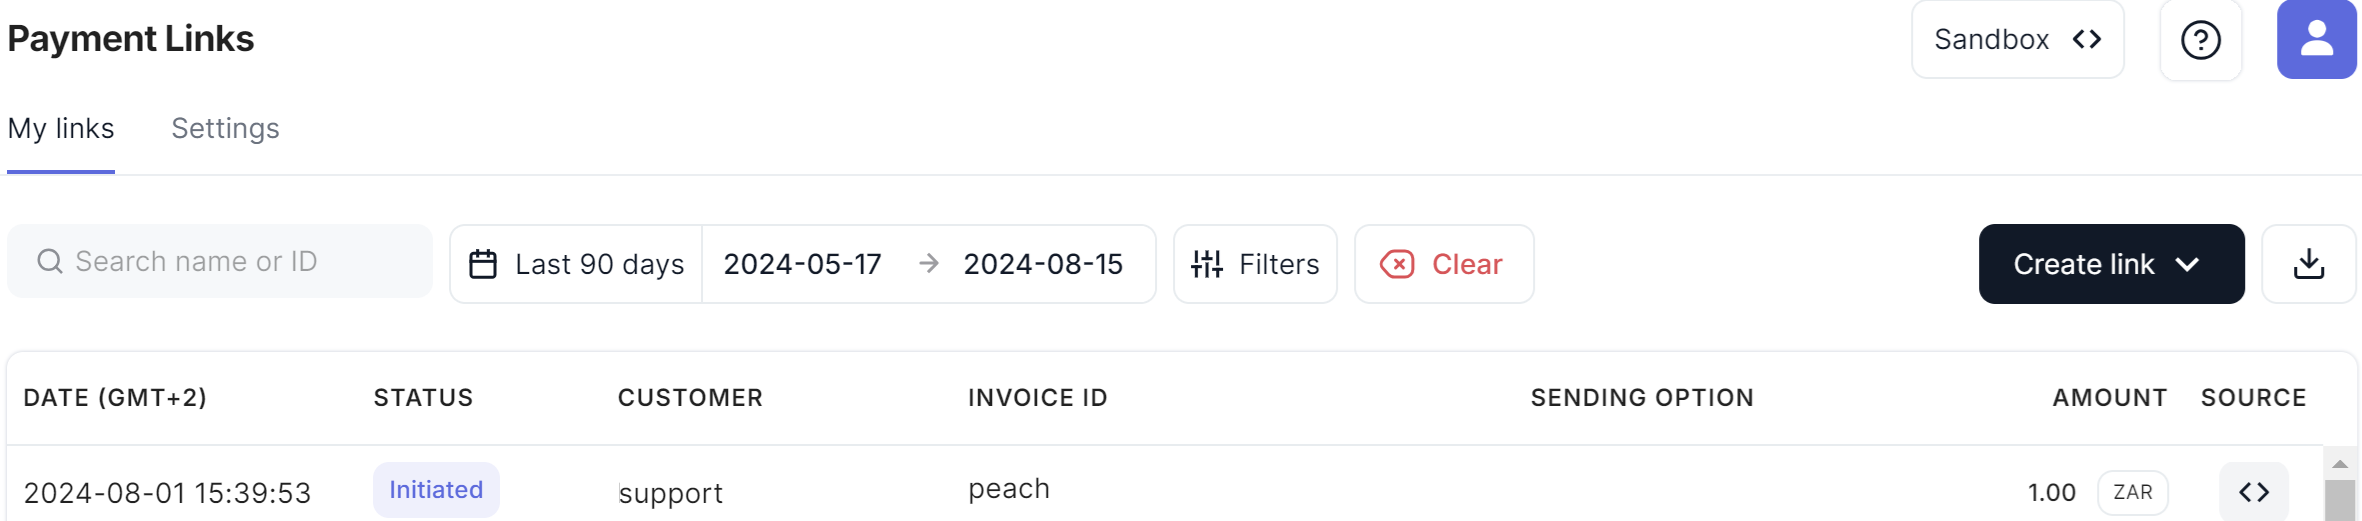
Link status in Dashboard.
To view the detailed link status, select a transaction. A details panel shows more information on the payment link.
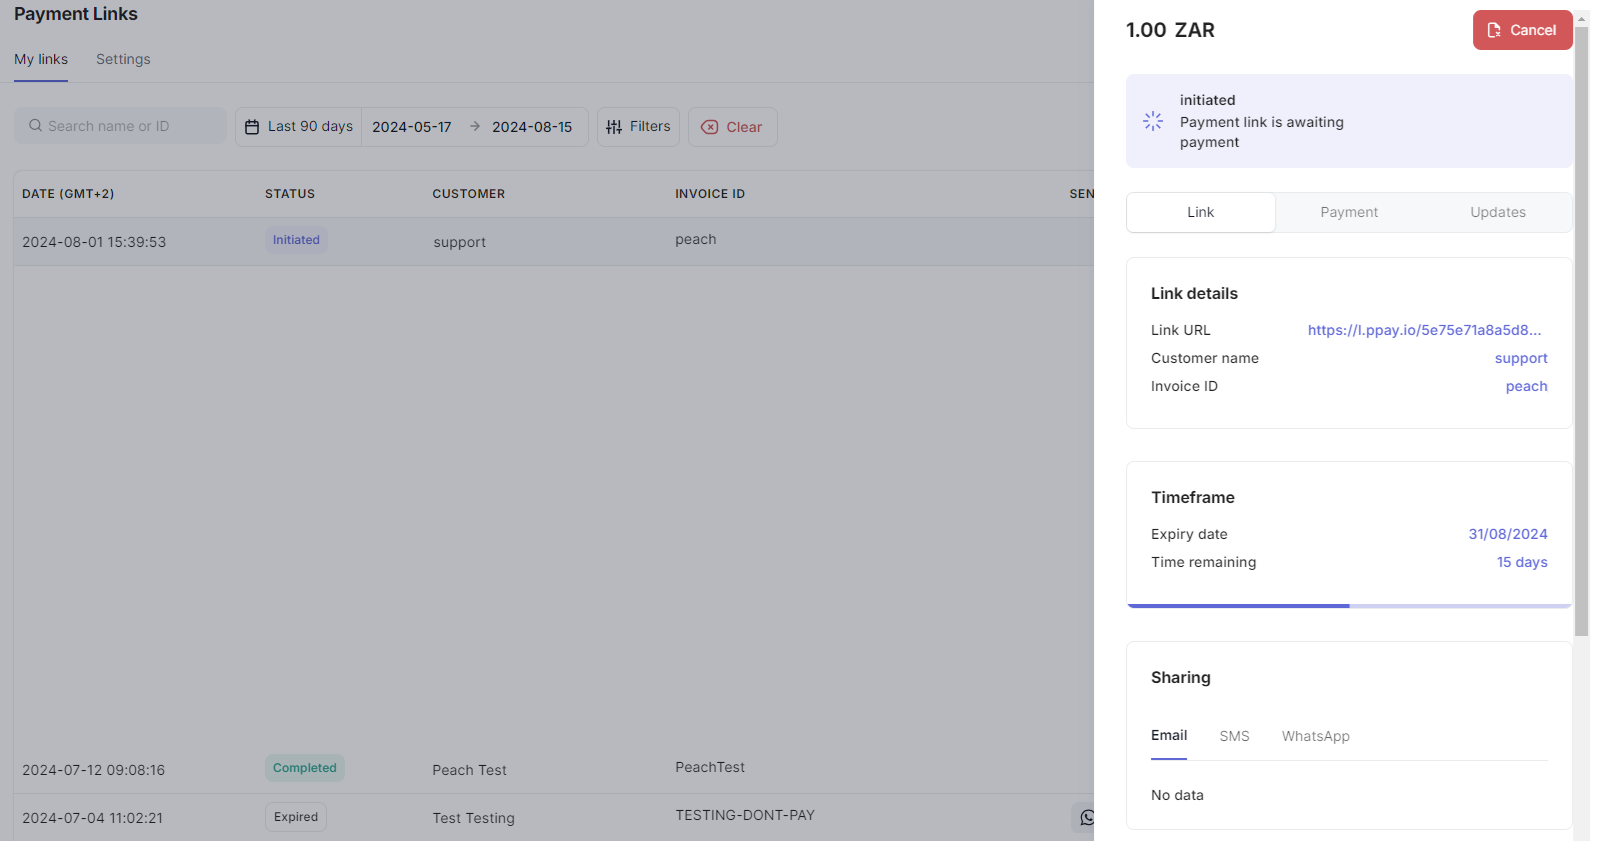
Detailed link status.
Search for a payment link
Search for a payment link as follows:
- In the left navigation menu, click Payment Links > My links.
- Enter the partial customer name or invoice ID, or full payment link ID or bulk ID into the search bar. The search results appear as you type.
Filter payment links
Filter payment links by date, amount, status, or sending options as follows:
- In the left navigation menu, click Payment Links > My links.
- Click Today and select a predefined range, for example, Last 30 days. Otherwise, click the first date field and select the date from which you want to filter, then click the date to which you want to filter, then click Apply.
- Click Filters to expand the filter section.
- In the Amount section, select the appropriate option from the list, for example, Greater than. Enter the amount, for example, 1000 to filter transactions greater than 1000.
- In the Status section, select the appropriate statuses that you want to filter for, for example, Initiated and Processing.
- In the Sending options section, click More. Select the sending options that you want to filter for, for example, Email.
- Click Apply.
This applies the filters that you selected.
Click the Clear button to remove all the filters.

Filter bar.
Cancel a payment link
Only certain roles can cancel payment links.
Cancel a payment link that is in the initiated state on the Dashboard as follows:
- Go to Payment Links > My links.
- Click the payment link that you want to cancel.
- In the details panel that appears, click Cancel link in the upper right of the screen.
- In the confirmation window that appears, click Confirm.
The payment link's status changes to cancelled and customers cannot pay using the link.
Download payment links
You can download an export of up to 20 000 payment links from the Dashboard.
Export the payment links that you are viewing as follows:
- Go to Payment Links > My links.
- Select filters to display the payment links that you're interested in.
- Click the Download a CSV button in the upper right of the screen.
You device downloads the payment links CSV.
Payment Links settings
Edit payment link templates
Only certain roles can edit payment link templates.
You can edit the email and SMS templates. You cannot edit the Peach Payments' WhatsApp template, but you can send WhatsApp messages from your own Meta Business Account using your own template.
- Go to the Payment Links Settings page.
- Scroll to the Email or SMS section.
- Edit the email, using the placeholder values where applicable.
- Click Save.
If necessary, you can use the Revert to default buttons to return the templates to their original states.
Send WhatsApp messages from your Meta Business Account
Only certain roles can edit the WhatsApp credentials.
To send WhatsApp payment link messages from your own Meta Business Account using your own custom template, you must complete the setup process in your Meta Business Account and configure the credentials in the Peach Payments Dashboard.
- Before you begin, review Meta's WhatsApp Business Platform policy and spam enforcement documentation and messaging limits to understand the requirements and restrictions for sending WhatsApp messages. Failure to adhere to these policies could result in your account being blocked temporarily or indefinitely, or even being permanently disabled. Peach Payments cannot be held responsible if your account is blocked or disabled.
- You are liable to pay for all WhatsApp messages you send.
Prerequisites
Before you begin, ensure you have:
- An active and approved Meta business portfolio.
- An active and approved business app associated with your business portfolio. The app must:
- Have policy document URLs and terms of service URLs available (required before the app can be published).
- Have a verified phone number connected.
- Have the WhatsApp App connected to your business portfolio.
- Be registered and published before it can fully connect via the WhatsApp API.
- A Meta Developer account with full-control permissions to your Meta business portfolio. The user executing the setup steps must have admin permissions.
1: Create a system user
Create a system user in your Meta Business Account to generate an access token:
- Log in to your Meta Business Account.
- In the left navigation menu, click Users and then select System users.
- Click Add.
- In the Create system user pop-up, enter a name for the system user (for example, "Payment Links Integration").
- Select the Admin system user role.
- Click Create system user. A confirmation message appears.
- Click Done.
2: Assign assets and generate an access token
After creating the system user, assign your app to it and generate an access token:
- On the System users page, find the user you created and click Assign Assets.
- In the Select assets and assign permissions pop-up, choose the asset type Apps.
- Select your app from the list.
- Under Assign permissions, give the system user Full control to manage the app.
- Click Assign assets. A confirmation message appears.
- Click Done.
Generate the access token:
- Click the system user you created.
- Click the Generate token button.
- In the pop-up, select the app for which you want to generate a token.
- Set the token expiration to Never.
- Under Assign permissions, grant the following permissions:
whatsapp_business_messagingwhatsapp_business_management
- Click Generate token.
- The system creates a token. Copy this token immediately as you won't be able to retrieve it again. You can regenerate a new one if needed.
- Click Done.
Keep your access token secure. This token is sensitive information that should only be shared with authorised personnel. If the token is compromised, you can regenerate a new one from the System users page.
3: Create a message template
You must create an approved message template in WhatsApp Manager before you can send payment links via WhatsApp. Message templates are required for all business-initiated conversations on WhatsApp.
- In your Meta Business Account, in the left-hand menu, navigate to Products and select WhatsApp.
- Click WhatsApp Manager at the bottom right of the Privacy and data sharing section.
- In WhatsApp Manager, go to Account tools and click Message templates.
- Click Create template.
- Select Utility as the category for the template.
- Enter a template name (for example, "Payment Link Notification") and select the language (for example, English (US)).
- Click Continue.
- Select a Header type (Text, Image, Video, Document, or None). For Payment Links, choose None.
- In the Body section, type your message. While you can set up your own template structure, you must use the four variables (
{{1}},{{2}},{{3}}, and{{4}}) shown in the example below, you cannot have more or less. For example:Hello {{1}}, You have received a payment link from {{2}}. Due: {{3}} Amount: {{4}} Thanks - Optional: In the Footer section, you can add a short line of text, such as
Secured by Peach Payments.. - Optional: Under Buttons, click Add button and select Visit website.
- Change the button text to
Pay Nowor similar. - Set the URL type to Dynamic.
- Enter the static part of the URL,
https://links.peachpayments.com/, followed by{{1}}. This creates a dynamic link where the payment link ID is inserted. - In the Variable Samples section, provide examples for each variable you used in the body and URL. For example:
{{1}}- "Grace"{{2}}- "Your Company Name"{{3}}- "2025-11-01"{{4}}- "ZAR 100"- Website URL
{{1}}- "123"
- Change the button text to
- Click Preview and then Submit for review to send the template for approval.
Template approval can take up to 24 hours. You cannot use the template until Meta approves it. Ensure your template complies with Meta's WhatsApp Business Policy and Commerce Policy to avoid rejection.
4: Get the phone number ID
Retrieve the phone number ID from your Meta app dashboard. The phone number ID differs from the WhatsApp Business Account ID.
- In your Meta app dashboard, go to Products > WhatsApp APIs setup.
- Find and note the Phone number ID. The phone number ID is a numeric identifier that you need as your Client ID in the Peach Payments Dashboard.
You cannot get the phone number ID from Settings > Accounts > WhatsApp accounts.
5: Configure WhatsApp credentials in the Peach Payments Dashboard
When you have your access token, approved template, and phone number ID, configure Payment Links to use your Meta Business Account:
- Log in to the Peach Payments Dashboard.
- In the left navigation menu, click Payment Links.
- Select the Settings tab.
- Scroll to the WhatsApp credentials section.
- Enter the following information:
- Template name: Enter the exact name of your approved WhatsApp message template (the name you created in step 3).
- Token: Paste the access token you generated in step 2.
- Client ID: Enter the phone number ID you retrieved in step 4.
- Click Save.
When you create and send payment links using WhatsApp, your Meta Business Account sends the messages using your custom template. The message includes the payment link as configured in your template's URL button.
Disable custom WhatsApp messaging
To stop sending WhatsApp messages from your Meta Business Account and revert to using Peach Payments' default WhatsApp messaging:
- Go to the Payment Links Settings page.
- Scroll to the WhatsApp credentials section.
- Click Clear to remove your credentials.
After clearing your credentials, Payment Links uses Peach Payments' default WhatsApp template and phone number for all WhatsApp messages.
Edit contact details
The email address displayed beneath the Pay now button on a payment link emailed to a customer is your company's business contact. To update this email address without changing your business contact or to change the email address to a phone number, contact support.
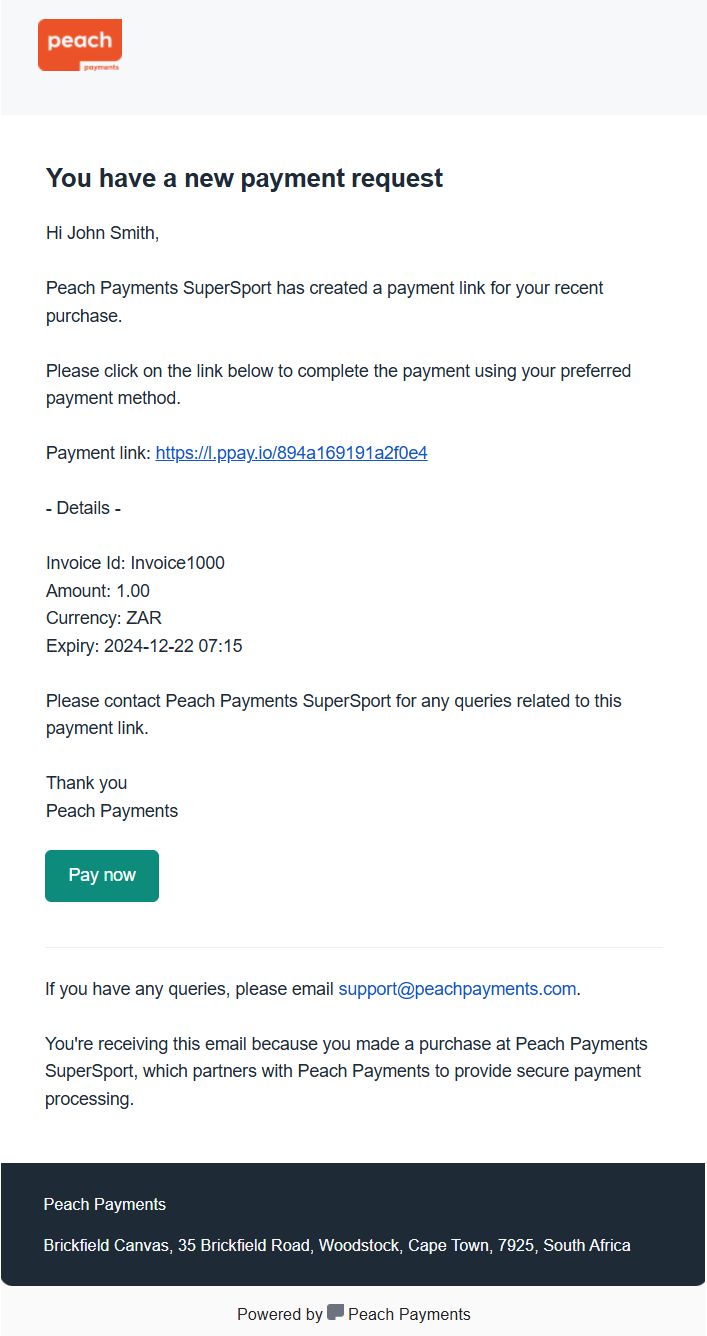
Payment link email.
Add a webhook
To learn more about webhooks and how they work, see the Webhooks section.
Follow these instructions to add or delete a webhook using the Peach Payments Dashboard.
Create API credentials
Only certain roles can create API credentials.
- Log in to the Peach Payments Dashboard.
- In the left navigation menu, click Payment Links.
- Select the Settings tab, scroll down to the API credentials section, and click + Create API credentials.
Your client ID, client secret, merchant ID, and entity ID appear in the API credentials section.
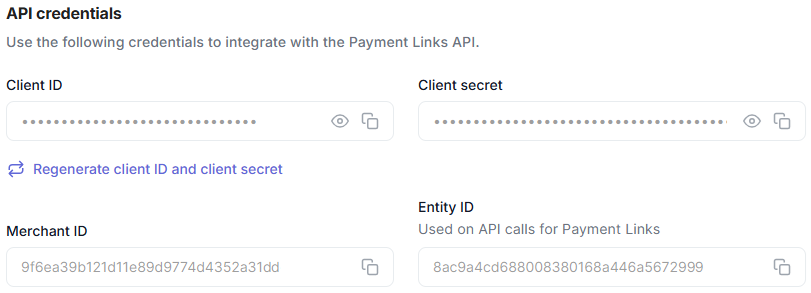
Payment Links API credentials.
If someone compromises your credentials, use the Regenerate client ID and client secret option to create new API credentials.
Add terms of service
You can make it mandatory that your customers have to agree to your terms of service before being able to pay payment links.
Only certain roles can add and configure your terms of service.
Add and configure your terms of service for payment links on the Dashboard as follows:
- Log in to the Peach Payments Dashboard.
- In the left navigation menu, click Payment Links.
- Select the Settings tab, scroll down to the Legal policy section, and paste your terms of service in the Terms of service field, adhering to the 30 000 character count restriction.
- To make it mandatory that your customers have to agree to your terms of service before making payment, select the Require your customers to consent to your terms of service check box and click Save. Not selecting the check box displays the terms of service link to your customers but does not require that they accept them.
A link to your terms of service appears on the payment link page. If you made it mandatory, your customers now need to accept your terms of service before they can pay a payment link.
Updated about 1 month ago