Shopify
Connect Peach Payments to your Shopify store.
Peach Payments offers a payment extension for Shopify which allows you to accept online payments using all the payment methods offered by Checkout.
Overview
| Item | Description |
|---|---|
| Countries | South Africa, Kenya, and Mauritius. |
| Recurring payments | Does not support recurring payments, only once-off payments. |
| Refunds | Supports full or partial refunds from the Shopify dashboard. You must refund certain payment methods manually. |
| Currencies | All currencies configured for your account. |
| Pricing | See the Peach Payments website. |
| Account activation | Requires review by Peach Payments South Africa. Contact support for assistance. |
Register account
To connect Peach Payments to your Shopify store, you must have a Peach Payments account.
As part of the registration process, Peach Payments gives you access to the Peach Payments Dashboard where you can retrieve your sandbox and live credentials and view transactions.
Get started with Shopify
Link your Peach Payments account to Shopify in one of the following ways:
- Using the Peach Payments Dashboard. Peach Payments recommends this method.
- Using the Shopify user interface.
Link your Peach Payments account using the Peach Payments Dashboard
You can link your sandbox or live Peach Payments Dashboard to your Shopify store. To link your sandbox Dashboard, follow the instructions below from the sandbox Dashboard.
The Shopify section only appears in the Connect section if it has been configured for your account. If you don't see the Shopify section, contact support to configure it for your account.
-
Log in to the Peach Payments Dashboard.
-
In the Connect section, click Shopify.
-
In the Connect Shopify store section, click Connect store.
-
In the Link your Peach account browser window that opens, enter your store name and click Link account. Your Shopify store name resembles
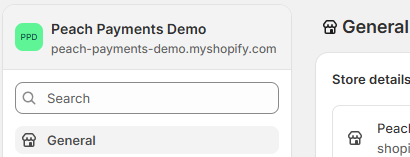
<store-name>.myshopify.com(for example,peach-payments-demo.myshopify.com) and you can retrieve it from the Settings section, or, if you're using a custom domain, from the Settings > Domains section of your Shopify store.
Shopify store name in Settings.
-
In Shopify, click Install app.
-
If you are connecting your sandbox Dashboard to your Shopify store to test payments, set the Test mode toggle to the on position. Sandbox Dashboard cannot accept live payments so do not set the toggle to the off position; doing so causes transactions to fail. If you are connecting your live Dashboard to test payments, set the Test mode toggle to the on position. Set the toggle to the off position to accept live payments.
-
Click Activate to activate the app.
-
To configure a webhook, follow the instructions in the webhook documentation.
After you have started accepting live payments, setting the Test mode toggle to the on position on your Shopify store causes your store to stop processing live transactions and start processing test transactions. Peach Payments advises that you rather use a standalone sandbox Shopify store to test.
A message stating Peach Payments activated appears. To confirm that the Peach Payments app is active, select Payments from the left panel and confirm that Peach Payments appears in the Additional payment methods section as active.
Link your Peach Payments account using your API credentials
Peach Payments recommends following the simpler steps in the section above to link your Peach Payments account to your Shopify store.
Link your Peach Payments account to your Shopify store as follows:
-
Enter your Shopify store name, live entity ID, and secret token, and click Link account. Your Shopify store name resembles
<store-name>.myshopify.com(for example,peach-payments-demo.myshopify.com) and you can retrieve it from the Settings section, or, if you're using a custom domain, from the Settings > Domains section of your Shopify store.
Shopify store name in Settings.
-
Click Install app.
-
If you are connecting your sandbox Dashboard to your Shopify store to test payments, set the Test mode toggle to the on position. Sandbox Dashboard cannot accept live payments so do not set the toggle to the off position; doing so causes transactions to fail. If you are connecting your live Dashboard to test payments, set the Test mode toggle to the on position. Set the toggle to the off position to accept live payments.
-
Click Activate to activate the app.
-
To configure a webhook, follow the instructions in the webhook documentation.
After you have started accepting live payments, setting the Test mode toggle to the on position on your Shopify store causes your store to stop processing live transactions and start processing test transactions. Peach Payments advises that you rather use a standalone sandbox Shopify store to test.
A message stating Peach Payments activated appears. To confirm that the Peach Payments app is active, select Payments from the left panel and confirm that Peach Payments in the Additional payment methods section is active.

Additional payment methods.
Confirm that you are accepting live payments
To confirm that you are accepting live payments:
- Log in to the live Peach Payments Dashboard.
- In the Connect section, click Shopify.
- In the Connect Shopify store section, check that the status of your Shopify store is
Successful. - Log in to your Shopify store, go to Settings, and select Payments.
- In the Additional payment methods section, check that Peach Payments appears as active in the list and that test mode is not enabled.
If you have any issues, check the frequently asked questions.
Process refunds
To process refunds, follow Shopify's guide.
- Do not process refunds from the Peach Payments Dashboard. The Dashboard cannot inform Shopify of the refund, so although you've refunded the customer, Shopify does not know that the customer has received a refund.
- You cannot refund Apple Pay transactions from your Shopify dashboard.
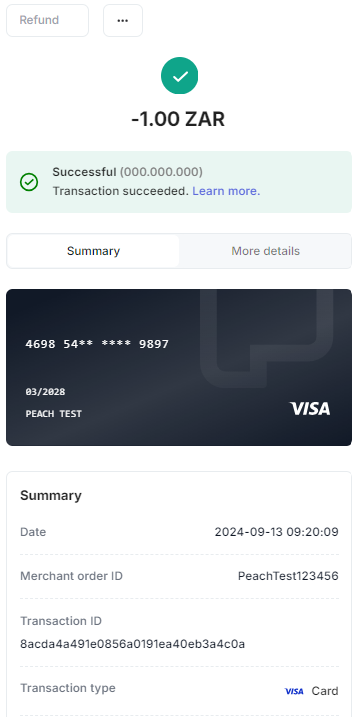
When the refund is complete, you can view the refunded transaction in the Peach Payments Dashboard.

Refund in Peach Payments Dashboard.
Deactivate and uninstall Peach Payments from your Shopify store
To stop accepting payments using Peach Payments, you can deactivate and, optionally, uninstall the Peach Payments app:
- Log in to your Shopify store, go to Settings, and select Payments.
- Click the Peach Payments section.
- Scroll to the bottom of the page and click Deactivate.
- In the pop-up that appears, click Deactivate. This deactivates Peach Payments and removes the payment method from your store. If you think you might reactivate the payment method later, you can stop at this point.
- To uninstall the Peach Payments app, click Uninstall.
- In the pop-up that appears, click Uninstall.
This uninstalls the Peach Payments app and you can no longer accept payments through Peach Payments.
FAQ
If you run into any issues with Shopify, check the support knowledge base for the issue and solution.
If you can't find the issue, contact support for assistance.
How do I show a Payflex, ZeroPay, Float, Happy Pay, or Mobicred instalment calculator on my store
Follow the relevant payment method's documentation:
I'm trying to link my Shopify store, but when I enter the store name, why do I get a Not a valid store name error
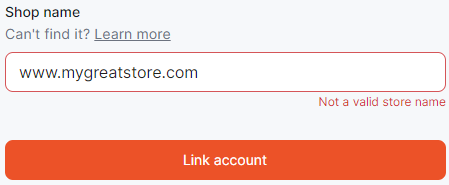
Not a valid store name errorIf you're getting the following error, you might be entering your store's custom domain instead of the store name.

Store name error.
Your Shopify store name resembles <store-name>.myshopify.com (for example, peach-payments-demo.myshopify.com) and you can retrieve it from the Settings section, or, if you're using a custom domain, from the Settings > Domains section of your Shopify store.

Shopify store name in Settings.
I linked my Shopify store to Peach Payments; why doesn't the Peach Payments payment method appear on Checkout
When linking your store, you might have forgotten to complete the final step in the process, that is, clicking Activate. Uninstall the app, then link your store again, ensuring that you click Activate as the final step.
Updated 18 days ago