Advanced options
Below are examples of advanced workflow customisation for COPYandPAY. Each example uses the wpwlOptions variable. You can find the full reference for this variable in the COPYandPAY API reference.
Include jQuery for the JavaScript examples from COPYandPAY to work.
<script src="https://code.jquery.com/jquery.js" type="text/javascript"></script>Add custom fields
Add parameters to the payment form using the wpwlOptions variable before loading COPYandPAY. The example below adds a custom parameter to the payment form for recording the number of instalments requested by the customer. Follow these steps:
- Prepare the checkout.
- Use the
wpwlOptionsAPIonLoadevent to add the custom field HTML to the payment form. - Set the name of the HTML input field to your API parameter, for example,
recurring.numberOfInstallments.
<form action="https://developer.peachpayments.com/docs/oppwa-integrations-copyandpay-advanced-options" class="paymentWidgets" data-brands="VISA MASTER AMEX"></form>body {background-color:#f6f6f5;}var wpwlOptions = {
style: "card",
onReady: function() {
var numberOfInstallmentsHtml = '<div class="wpwl-label wpwl-label-custom" style="display:inline-block">Number of Installments</div>' +
'<div class="wpwl-wrapper wpwl-wrapper-custom" style="display:inline-block">' +
'<select name="recurring.numberOfInstallments"><option value="1">1</option><option value="3">3</option><option value="5">5</option></select>' +
'</div>';
$('form.wpwl-form-card').find('.wpwl-button').before(numberOfInstallmentsHtml);
}
}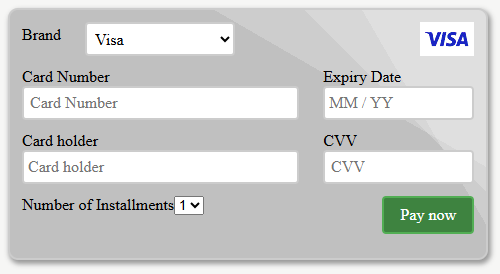
Card form with a custom field.
Change label
You can change a label in the payment form using the wpwlOptions variable before loading the COPYandPAY payment widget. The following example updates the credit card brand label in the payment form.
- Prepare the order.
- Use the
wpwlOptionsAPIonLoadevent and a jQuery selector to set the desired value of the label.
<form action="https://developer.peachpayments.com/docs/oppwa-integrations-copyandpay-advanced-options" class="paymentWidgets" data-brands="VISA MASTER AMEX"></form>body {background-color:#f6f6f5;}var wpwlOptions = {
onReady: function() {
$('.wpwl-label-brand').html('Custom label');
}
}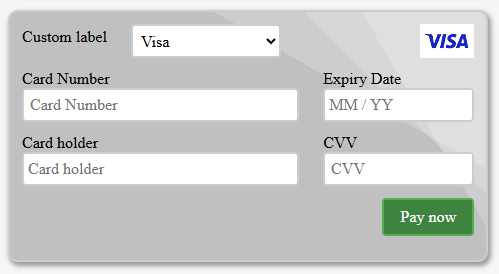
Card form with a custom label.
Have card holder mandatory
By default, the cardholder is optional. Some integrations require it to be mandatory. To achieve this, apply the check on the onBeforeSubmitCard event, as shown below.
- Prepare the checkout.
- Use the
wpwlOptionsAPIonBeforeCardSubmitevent to check if the holder contains two or more characters.
<form action="https://developer.peachpayments.com/docs/oppwa-integrations-copyandpay-advanced-options" class="paymentWidgets" data-brands="VISA MASTER AMEX"></form>body {background-color:#f6f6f5;} var wpwlOptions = {
style:"card",
onReady: function(e){
$('.wpwl-form-card').find('.wpwl-button-pay').on('click', function(e){
validateHolder(e);
});
},
onBeforeSubmitCard: function(e){
return validateHolder(e);
}
}
function validateHolder(e){
var holder = $('.wpwl-control-cardHolder').val();
if (holder.trim().length < 2){
$('.wpwl-control-cardHolder').addClass('wpwl-has-error').after('<div class="wpwl-hint wpwl-hint-cardHolderError">Invalid card holder</div>');
return false;
}
return true;
}Create custom UI
You can change the behaviour of the payment page when there are multiple types of payment methods using the wpwlOptions variable before loading the COPYandPAY payment widget.
- Prepare the checkout.
- Use the
wpwlOptionsAPIonLoadevent to iterate through each.wpwl-container, adding custom HTML before the container. - Create a jQuery click handler to show the container on click.
<form action="https://developer.peachpayments.com/docs/oppwa-integrations-copyandpay-advanced-options" class="paymentWidgets" data-brands="VISA MASTER AMEX PAYPAL"></form> h4.payHead {
font-family: Candara, Calibri, Segoe, "Segoe UI", Optima, Arial, sans-serif;
font-size: 14px;
color: #09f;
border: 2px solid #09f;
border-radius: 4px;
padding: 5px 8px;
cursor: pointer;
}
.wpwl-container {display:none;} /* create custom UI */
function wrapElement(element) {
var id = $(element).attr("id");
var wrapId = "wrap_" + id;
$(element).wrap('<div id="' +wrapId+'"></div>"');
return $('#'+wrapId);
}
var methodMapping = {
"card": " Click to pay with card",
"virtualAccount-PAYPAL": " Click to pay with PayPal"
}
var wpwlOptions = {
style: "plain",
onReady: function() {
$('.wpwl-container').each(function() {
var id = $(this).attr("id");
wrapElement(this).hide().before("<h4 class='payHead'>" + methodMapping[id.substring(0, id.lastIndexOf("_"))] + "</h4>");
});
$("h4").click(function() {
$(this).next().slideToggle();
});
}
}
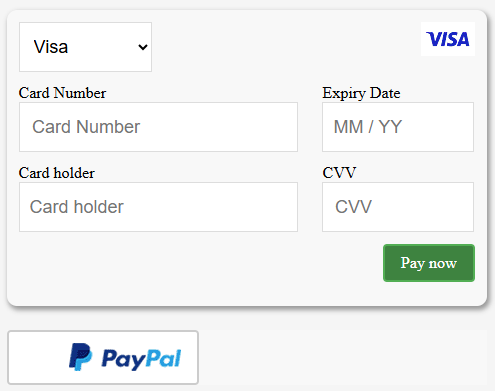
Custom user interface.
Create custom UI - box model
You can change the behaviour of the payment page when there are multiple types of payment methods using the wpwlOptions variable before loading the COPYandPAY payment widget.
- Prepare the checkout.
- Use the
wpwlOptionsAPIonReadyevent to make some adaptations to the containers. - Create a jQuery click handler to show the container on click.
<form action="https://developer.peachpayments.com/docs/oppwa-integrations-copyandpay-advanced-options" class="paymentWidgets" data-brands="VISA MASTER PAYPAL"></form>.wpwl-form {background:#f8f8f8}
.wpwl-label-brand {display:none}
.wpwl-form-card { background: #f8f8f8; border:0px}
.wpwl-control, input.wpwl-control{
background: white;
border: 1px solid #ddd;
box-shadow: none;
border-radius: 0px;
font-family:"ff-good-headline-web-pro-con", "Pathway Gothic One", sans-serif;
text-transform:none;
padding:10px;
font-size: 18px;
height: 50px;
}
.input-text:focus, input[type=text]:focus, input[type=tel]:focus, input[type=url]:focus, input[type=password]:focus, input[type=search]:focus, textarea:focus {background-color: white;}
.wpwl-brand-PAYPAL,
.wpwl-brand, .wpwl-img { margin: 0 0 0 auto;}var wpwlOptions = {
locale: "en",
style:"card",
onReady:function(){
$(".wpwl-brand-PAYPAL").click(function(){$(".wpwl-form-onlineTransfer-PAYPAL .wpwl-group-country, .wpwl-form-onlineTransfer-PAYPAL .wpwl-wrapper-submit").slideToggle()})
}
}
Custom UI - box model.
Summary page
It is possible to use COPYandPAY to temporarily store the payment information after submission rather than executing it straight away. This can be useful if you want to display an order summary page before committing the payment. You can achieve this using the wpwlOptions variable before loading COPYandPAY.
To commit the payment after displaying the summary page, you can include the following form on the summary page. When the customer presses submit, Peach Payments executes the payment.
<form action="https://sandbox-card.peachpayments.com/v1/checkouts/{id}/payment" method="POST">

<input type="submit" value="Pay now" /><form action="https://developer.peachpayments.com/docs/oppwa-integrations-copyandpay-advanced-options" class="paymentWidgets" data-brands="VISA MASTER AMEX"></form>body {background-color:#f6f6f5;}var wpwlOptions = {useSummaryPage: true,
onSaveTransactionData: function(data) {
console.log(data);
location.href = "/opp-example-summary-page?checkoutId={checkoutId}";
}
}Store payment details
Two ways exist to store the payment details used during checkout:
- Set the
createRegistrationparameter totrueduring step 1: prepare the checkout. - Add a checkbox to the COPYandPAY form to let the customer decide whether to store the card details.
The example shown below is for option 2.
<form action="https://developer.peachpayments.com/docs/oppwa-integrations-copyandpay-advanced-options" class="paymentWidgets" data-brands="VISA MASTER AMEX"></form>body {background-color:#f6f6f5;}var wpwlOptions = {
onReady: function() {
var createRegistrationHtml = '<div class="customLabel">Store payment details?</div><div class="customInput"><input type="checkbox" name="createRegistration" value="true" /></div>';
$('form.wpwl-form-card').find('.wpwl-button').before(createRegistrationHtml);
}
}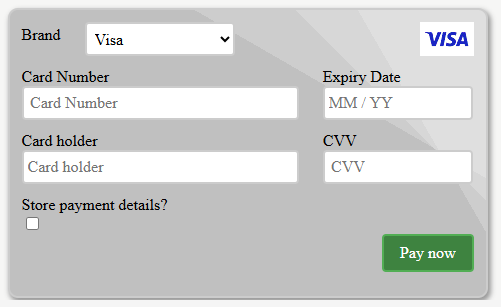
Allow customers to store payment details.
Field order in the payment form
COPYandPAY allows you to update the order of fields in the payment form. This reordering also adjusts the order in which fields get tabbed.
For details, refer to the JavaScript section in the following integration form.
<form action="https://developer.peachpayments.com/docs/oppwa-integrations-copyandpay-advanced-options" class="paymentWidgets" data-brands="VISA MASTER AMEX"></form>body {background-color:#f6f6f5;}var wpwlOptions = {
style:"card",
onReady:function(){
$(".wpwl-group-cardHolder").after($(".wpwl-group-expiry"));
$(".wpwl-group-cardNumber").before($(".wpwl-group-cardHolder"));
}
}Billing address
It's possible to have the billing address fields available and pre-filled. The two options to do this are:
-
Pre-filled data in the billing address that can be editable.
To display the form, use the following option inwpwlOptions:var wpwlOptions = { billingAddress: { country: "US", state: "NY", city: "New York", postcode: "12345", street1: "Suite 1234", street2: "Some Road" }, mandatoryBillingFields: { country: true, state: true, city: true, postcode: true, street1: true, street2: false } }The following snippets provide the source:
<form action="https://developer.peachpayments.com/docs/oppwa-integrations-copyandpay-advanced-options" class="paymentWidgets" data-brands="VISA MASTER AMEX"></form>body {background-color:#f6f6f5;}var wpwlOptions = { billingAddress: { country: "US", state: "NY", city: "New York", postcode: "12345", street1: "Suite 1234", street2: "Some Road" }, mandatoryBillingFields:{ country: true, state: true, city: true, postcode: true, street1: true, street2: false } } -
Display empty fields in the billing address so the customer can edit them.
To display the form, use the following option inwpwlOptions:var wpwlOptions = { billingAddress: {}, mandatoryBillingFields: { country: true, state: true, city: true, postcode: true, street1: true, street2: false } }The following snippets provide the source:
<form action="https://developer.peachpayments.com/docs/oppwa-integrations-copyandpay-advanced-options" class="paymentWidgets" data-brands="VISA MASTER AMEX"></form>body {background-color:#f6f6f5;}var wpwlOptions = { billingAddress: {}, mandatoryBillingFields:{ country: true, state: true, city: true, postcode: true, street1: true, street2: false } } -
Notes:
- Use the
mandatoryBillingFieldsoptions to control whether the system validates a field for an empty value. - By default, the billing address fields are mandatory.
- The state appears as a drop-down for the United States and Canada.
- Use the
MaskCvv page
You can mask the CVV on COPYandPAY by setting maskCvv to true in the wpwlOptions variable before loading the COPYandPAY payment widget.
var wpwlOptions = {
    maskCvv: true
};
The following snippets provide the source:
<form action="https://developer.peachpayments.com/docs/oppwa-integrations-copyandpay-advanced-options" class="paymentWidgets" data-brands="VISA MASTER AMEX"></form>body {background-color:#f6f6f5;}var wpwlOptions = {
maskCvv: true
}Brand detection
To change brand detection behaviour, use the following options in the wpwlOptions variable before loading the COPYandPAY payment widget.
var wpwlOptions = {
    // Enable brand detection
    brandDetection: true,

    // Use the internal BIN list for precise brand detection
    brandDetectionType: "binlist",

    // Prioritise the detected brands
    brandDetectionPriority: ["CARTEBANCAIRE", "VISA", "MAESTRO", "MASTER"]
};
The following snippets provide the source:
<form action="https://developer.peachpayments.com/docs/oppwa-integrations-copyandpay-advanced-options" class="paymentWidgets" data-brands="VISA MAESTRO MASTER CARTEBANCAIRE"></form>body { background-color:#f6f6f5; }var wpwlOptions = {
brandDetection: true,
brandDetectionType: "binlist",
brandDetectionPriority: ["CARTEBANCAIRE","VISA","MAESTRO","MASTER"],
}Disable non-detected brands
By default, brand detection recommends valid brands without enforcing the selection. The customer can still choose any brand.
To allow the customer to select the detected brands, use the onDetectBrand callback function. This function receives a list of detected brands as its argument. With this information, you can disable or hide any undesired brands.
The following snippet demonstrates how to disable all brands except the detected ones.
Try using the BIN 513678, which detects multiple brands.
<form action="https://developer.peachpayments.com/docs/oppwa-integrations-copyandpay-advanced-options" class="paymentWidgets" data-brands="VISA MAESTRO MASTER CARTEBANCAIRE"></form>body { background-color:#f6f6f5; }var wpwlOptions = {
brandDetection: true,
brandDetectionType: "binlist",
brandDetectionPriority: ["CARTEBANCAIRE","VISA","MAESTRO","MASTER"],
onDetectBrand: function (detectedBrands) {
var $opts = $("select.wpwl-control-brand > option");
if (detectedBrands && detectedBrands.length > 0) {
// If there is at least one detected brand, look at each configured brand
$opts.each(function (i, opt) {
var $opt = $(opt);
if (detectedBrands.indexOf($opt.val()) !== -1) {
// If the configured brand is also a detected brand, show it
$opt.removeAttr("disabled");
} else {
// Otherwise, disable it
$opt.attr("disabled", "disabled");
}
});
} else {
// No detected brands. Enable all brands.
$opts.removeAttr("disabled");
}
}
};Hide detected brands
Sometimes, you might hide certain brands when detecting multiple brands. This can guide the customer to select your preferred brand. The two ways to use this feature are:
-
Custom brand images:
Use your own brand images andonDetectBrandas shown in the previous example. This method provides a list of detected brands, allowing you to control which images to show or hide. -
COPYandPAY logos style:
This style dynamically displays detected brands as you type the card number. You can change this behaviour by implementingonChangeBrand.
The following example hides all brands except the first detected brand. The hidden brands appear after the customer clicks three dots (...).
Try using the BIN 513678, which detects multiple brands.
<form action="https://developer.peachpayments.com/docs/oppwa-integrations-copyandpay-advanced-options" class="paymentWidgets" data-brands="VISA MAESTRO MASTER CARTEBANCAIRE"></form>body { background-color:#f6f6f5; }
.dots { margin-left: 4px; }
.dots-hidden { display: none; }var wpwlOptions = {
style: "logos",
brandDetection: true,
brandDetectionType: "binlist",
brandDetectionPriority: ["CARTEBANCAIRE","VISA","MAESTRO","MASTER"],
// Optional. Use SVG images, if available, for better quality.
imageStyle: "svg",
onReady: function() {
ready = true;
},
onChangeBrand: function() {
hideBrands();
}
};
var ready = false;
var dotsClicked = false;
function hideBrands() {
if (!ready || dotsClicked) {
return;
}
// Clears all previous dots-hidden logos, if any
$(".wpwl-group-card-logos-horizontal > div").removeClass("dots-hidden");
// Selects all non-hidden logos. They are detected brands which otherwise would be shown by default.
var $logos = $(".wpwl-group-card-logos-horizontal > div:not(.wpwl-hidden)");
if ($logos.length < 2) {
return;
}
// Hides all except the first logo, and displays three dots (...)
$logos.first().after($("<div>...</div>").addClass("dots"));
$logos.filter(function(index) { return index > 0; }).addClass("dots-hidden");
// If ... is clicked, un-hides the logos
$(".dots").click(function() {
dotsClicked = true;
$(".dots-hidden").removeClass("dots-hidden");
$(this).remove();
});
}Unload or reload the widget
To reload the widget, removing it from the page is not enough. You must also remove event bindings and stop iframe communication. Otherwise, the previous widget may trigger unwanted error messages.
Use the wpwl.unload method and remove the static.min.js script to ensure proper unloading. Once done, you can reinsert the form with the brands and the paymentWidgets.js script to reload the widget.
var unloadWidget = function() {
  if (window.wpwl !== undefined && window.wpwl.unload !== undefined) {
    window.wpwl.unload();
    $('script').each(function() {
      if (this.src.indexOf('static.min.js') !== -1) {
        $(this).remove();
      }
    });
  }
};
The following snippets provide the source:
<form action="https://developer.peachpayments.com/docs/oppwa-integrations-copyandpay-advanced-options" class="paymentWidgets" data-brands="VISA MASTER AMEX"></form>body {background-color:#f6f6f5;}var unloadWidget = function() {
if (window.wpwl !== undefined && window.wpwl.unload !== undefined) {
window.wpwl.unload();
$("script").each(function () {
if (this.src.indexOf("static.min.js") !== -1) {
$(this).remove();
}
});
}
};
var $unloadButton = $("<button>Unload Widget</button>").on("click", unloadWidget);
$("body").prepend($unloadButton);
PayPal - Reload button for creating registration due to user consent
For PayPal, createRegistration information appears either in checkout data or wpwlOptions. If it’s set in wpwlOptions, merchants can dynamically update its value (true/false) based on customer preferences and then reload the PayPal button using wpwl.reloadButton() to apply the new workflow.
var wpwlOptions = {
  paypal: { "createRegistration": "true" }
};

function handleClick(checkbox) {
  wpwlOptions.paypal.createRegistration = checkbox.checked.toString();
  wpwl.reloadButton();
}
The following snippets provide the source:
<form action="https://developer.peachpayments.com/docs/oppwa-integrations-copyandpay" class="paymentWidgets" data-brands="PAYPAL"></form>

<div id="registrationConfig">
    <input type="checkbox" id="createRegistrationCheckbox" name="createRegistration" onclick="handleClick(this)" checked />
    <label for="createRegistration">Create Registration</label>
</div>
body {background-color:#f6f6f5;}var wpwlOptions = {
inlineFlow: ["PAYPAL","PAYPAL_CONTINUE"],
locale: "en",
style:"plain",
paypal: {"createRegistration":"true"},
forter: {siteId : "1a4cd159d7ae"}
}
function handleClick(checkbox) {
wpwlOptions.paypal.createRegistration = checkbox.checked.toString();
wpwl.reloadButton();
}
$("#createRegistrationCheckbox").prop("checked", "true" === wpwlOptions.paypal.createRegistration);